7. Patches
7.1. Defining a patch
These links are recommended reading for understanding the history and nature of patches and how they can be used with Mercurial.
7.2. Pitfalls
The standard patch format cannot describe binary files, renames, copies, or permission changes. If your patch needs to record any of those things, you will need to enable git patches via:
[diff]
git=True
Mercurial 1.5 improves its behavior in this regard. It will warn you when git diffs are required, or sometimes upgrade to the git format automatically. See also the diff section of the hgrc documentation.
Mercurial’s patch routines do not deal well with mixed EOLN between source files and patches. The patch.eol setting was introduced in 1.3 to improve this situation:
[patch]
eol = auto #strict, lf, or crlf
Note
When eol is set to auto, the patching engine will preserve the line endings of the patched file regardless of the line endings in the patch itself. You almost always want eol to be configured to auto. The only downside is that you cannot make a patch that changes the line endings of a source file.
See also the patch section of the hgrc documentation.
Applying a patch is not a foolproof operation. If the source file has diverged from the file that was used to create the patch, there may be conflicts during the patch application. These are written to a file with an .rej extension. TortoiseHg 2.0 includes a thg rejects command that can aid in the merging of the rejected chunks into the source file.
7.3. Export Patches
7.3.1. Changeset
To export a changeset as a patch file, use the changeset context menu of the Workbench to select . It writes the changeset to a file in the repository root folder.
7.3.2. Changeset Ranges
Select the start and end of a range of changesets in the Workbench and open the special revision range context menu. From this menu you can generate patches, generate a bundle, send emails, or visually diff the accumulated changes.
This is a very powerful feature and there is no restriction on the base and target changesets you can select.
7.3.3. Email
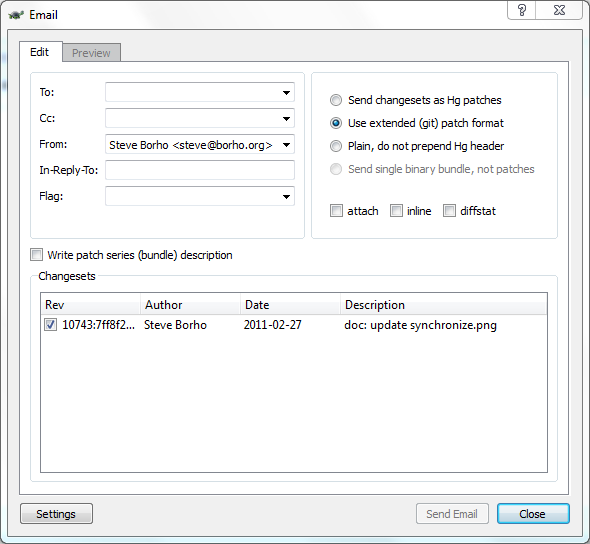
Email dialog of Workbench
To send a changeset as an email, use the changeset context menu of the Workbench. . This opens the e-mail dialog for this single changeset.
To send a changeset range, use the changeset range selection feature of the Workbench and select or .
Lastly, you can use the Email button on the sync tab of the Workbench to email all outgoing changes to the selected remote repository.
Note
You must configure SMTP to send patches via email
7.4. Import Patches

Import dialog of the WorkBench
The import dialog can be opened from the Repository menu of the Workbench, or via thg import. The dialog supports file and directory drag and drop.
You have the choice of importing directly into the repository, the working folder, a shelf file, or your patch queue.
Note
Importing a patch requires a clean working directory state. You must commit, revert, or shelve changes before importing a patch.
Note
If a patch does not import itself cleanly into the repository, the recommended recourse is to import the patch into your patch queue (qimport) and then qpush the patch. This uses TortoiseHg patch rejection dialog and preserves the meta-data in the patch header. Do not forget to qrefresh after resolving the rejected chunks.
Warning
If the patch you are importing does not have a commit message, Mercurial will try to launch your editor, just as if you had tried to import the patch from the command line. Your ui.editor needs to be a GUI app to make this work correctly.
7.5. Patch Queues
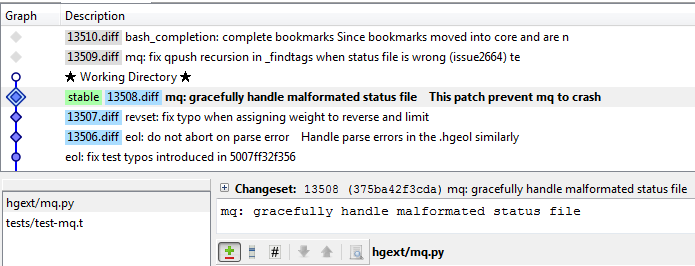
A patch queue in the repository graph
When MQ is enabled, several Workbench features are exposed. Context menu options are exposed in the changeset menus, your patch queue is graphed together with your repository’s history, and a Patch Queue is activated.
Double clicking on an unapplied patch, an applied patch other than the current qtip, or the qparent triggers a qgoto command; making the double clicked revision the current patch. Double clicking on any other revision will trigger a visual diff of that revision.
Note
The Workbench must be restarted after enabling or disabling the MQ extension in a repository. This is true of most extensions.
Note
It is recommended to learn the MQ extension before using the MQ features of the Workbench.
Changed in version 2.10: The Patch Queue task tab has been superseded by the Commit task tab and the Patch Queue dock.
7.6. Patch Rejects
As explained previously, patches are not guaranteed to apply cleanly to their intended source files. Prior to TortoiseHg 2.0, the only recourse available when patch chunks were rejected was to open the source file and the rejects file in an editor and manually fixup the rejected chunks.
TortoiseHg 2.0 introduces a dialog that makes this a little bit easier. If the shelve tool detects chunk rejections, it offers to open the rejected chunks in the rejects editor. The MQ tool also does this for qpush commands.
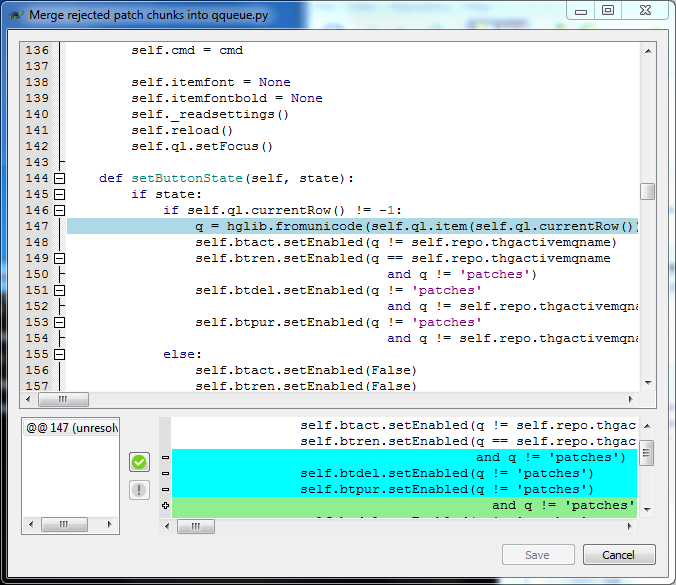
Resolve rejected patch chunks
The rejects editor is very basic. Your source file is opened in a QScintilla2 window for edit. Below the source file is the list of chunks that failed to apply to this file. When you click on a chunk in the list the editor jumps to the line where the chunk context was supposed to match. It is up to you to figure out why the chunk did not apply and to resolve it (perhaps even by ignoring the chunk). The resolved/unresolved states are for your own book keeping, so you know when all of the chunks have been dealt with. Once you have marked all of the chunks resolved, the Save button will become sensitive.